Sunday, 31 March 2013

EOTD #10 - Dramatic Arabic Smokey Eye Inspired Look

Sorry I haven't posted an EOTD in a while. I have just recently sold my compact camera since I want to get a new one. I do have an SLR but it is a bit hard to take self portraits with but I have managed to do it.

This EOTD was inspired by MissChievous video tutorial on Exotic Arab Smokey eye look. You can view the video here: http://www.youtube.com/watch?v=2Bpu6BWG7pg.

This look is quite dramatic and definitely not an everyday look. I did a double winged eyeliner in this look just to add a bit more drama to the look. And I also


Here are some steps on how to create this look:


  1. First I applied a base all over my eyelid. I used Makeup Forever Aqua Cream in no 16 Pink Beige.
  2. I then applied a pink eyeshadow all over my lid. I used MAC Extra Dimension Eyeshadow in Young Venus
  3. I patted a Urban Decay Gunmetal from the Naked Palette (a bluish metallic grey) on the outer third of the eye and then using a blending brush I blended it up to the crease. I keep adding the colour and blending it on the crease until I get the desired effect.
  4. I applied Urban Decay Creep from the Naked Palette (black eyeshadow with shimmer) on the outer v and blended it in with the previous grey eyeshadow applied on the crease.
  5. I applied Urban Decay Virgin on the brow bone and Sin on the inner corner of the eyes.
  6. I tightlined my upper and lower lash line with MAC Fluidline in Blacktrack and also lined my upper lash line and winged it out. 
  7. I also lined my lower lash lined and created a wing parallel to the upper lash line. 
  8. I then applied Rimmel Soft Kohl Kajal Eyeliner in Pure white in the area between the upper and lower winged line.
  9. I finished off by curling my lashes and applying MAC Haute & Naughty mascara. And lastly because it is such a dramatic eye makeup I used false lashes just to make the lashes look full and long. I used Manicare Glam Eyes Alicia lashes
Tip: to get that clean winged eyeshadow look I placed a scotch tape on the corner of my eyes so it created a clean winged look.

Because this eye makeup is so dramatic, I left the face and lips quite subtle. 
For the lips I used Revlon Just Bitten Kissable Balm Stain in Honey
And for the face I used the following products:
  • LancĂ´me Teint Visionnaire foundation in 04 Beige Nature
  • Makeup Academy (MUA) Bronzed Perfection Bronzer
  • MAC Peachtwist blush
  • Revlon Age Defying Spa Concealer in 002
Hope you like this look!

Bloglovin

Just a brief post to let you know I just joined Bloglovin so you can follow my blog from there - click the link below to follow me!

Follow my blog with Bloglovin

Saturday, 30 March 2013

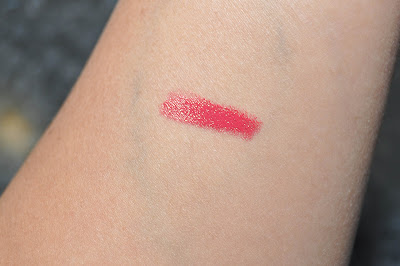
Mirenesse Lip Bomb #4 - Review and Swatch

I recently got some new lip products, even though I already have tons of lipsticks and lipglosses I just couldn't resist.

This review is for the Mirenesse Lip Bomb in shade #4 which retails for A$39. It is a gloss, stain and lip lacquer in one.

Product claims (from Mirenesse website): A satisfying NEW INNOVATION in lip colour; beyond gloss, stain or lip lacquer. Colour that drenches your lips for a juicy high impact colour that's feather-light and super-moist with a velvety finish. Power packed with a non-smearing pigment that lasts and lasts....


The colour that I got was #4 which is a bold bright pink.

The packaging is quite cute, it is a clear bullet shaped tube. The wand applicator is different from other lip glosses I own. It has the shape of an hourglass and I found it easy to apply the lip bomb.


The lip bomb itself....Well.... can I just say the colour is absolutely gorgeous and is very pigmented. One swipe on the lips is enough to give you a nice opaque finish. The lip bomb gives a beautiful glossy sheen finish on the lips. The consistency is similar to that of a lip gloss and I don't find it overly sticky at all. The lip bomb has a nice minty scent which I found was quite pleasant.

I found that this lip bomb lasts on your lips for hours. I was quite surprised at how long it lasted considering I drink quite a lot of water in the morning. I found that with eating and drinking the lip bomb stayed on my lips for a good 2 - 3 hours. I would imaging that it would have lasted longer if I did not drink or eat. Even after it started fading, it leaves a nice stain on the lips.
There are a few negative points that I had found. The lip bomb does feather a bit so you have to really be precise at applying it on the lips because once you accidentally mess it up, it does stain the skin. I also found that my lips felt a bit dry after a couple of hours of applying the lip bomb. However I think I can overcome this problem by applying some lip balm before applying the lip bomb. And lastly the price in my opinion is a negative as it is quite expensive compared to other lip products in the market.

Overall I really do love this lip bomb as this is probably the most long lasting lip gloss I've tried. I would definitely love to try the other colours but the price is holding me back. I guess I will have to keep an eye out for when it goes on sale.

Thursday, 28 March 2013

Review: Clinique Super City Block SPF30+

So you may or may not know that I am obsessed with applying sunscreen or skincare that has a minimum of SPF 30 everyday. Even on overcast day I still apply my sunscreen under my makeup. The latest product that I have been using is the Clinique Super City Block SPF 30+. It comes in a 40ml tube. It has a high protection of SPF 30+ and it provide protection from UVA and UVB rays.


Before using this, I didn't use much Clinique products. I have tried samples of Clinique moisturiser and treatments but it didn't suit my skin.  I was a bit worried when I purchased this that this may also be the case. However, this was not the case for this product. This oil free sunscreen suited my dry sensitive skin perfectly. I did not get any breakouts or reaction after applying this product.

The consistency of the product is quite thick but it is easily spreadable all over your face and you don't need much at all. This has last me a good few months. 

When you squeeze out the product you can see that it has a slight tint to it. The tint is quite light and I was worried it was going to leave a white tint on my face (my skin is around NC 25/30). However as you blend it out into your skin the tint is not as noticeable. Even though that this sunscreen is tinted, you may think it is similar to a tinted moisturiser but it's not. I don't think that it has much coverage at all after you blend it in your skin.

Top: with flash;   Bottom: without flash

Another thing I like about this sunscreen is that it does not have that strong sunscreen smell which I don't like. And after applying this all over my face I don't find that it is greasy at all and it actually works well as a primer under my makeup. I do find when my skin is very dry that I have to apply a hydrating moisturiser under the sunscreen but most times I apply this sunscreen on its own before applying makeup.

Overall I love this sunscreen and will definitely be repurchasing again. It is quite pricey though at AU$36 for the 40ml tube but as it did last me a few months I think it is a good value.

Wednesday, 20 March 2013

Moogoo Full Cream Moisturiser Review

So around a month ago I ran out of my moisturiser, MAC Lightful Ultramoisture Creme and I wanted to find something not too expensive. While I was browsing the health food shop I discovered the brand MooGoo. They are an organic skincare brand and I thought why not try an organic moisturiser. So after browsing around I got the MooGoo Full Cream moisturiser.


After purchasing I read a bit more about the MooGoo brand. They are made by an Australian company using natural and effective active ingredients designed for people with skin and scalp problems. Even though I don't really have a skin problem I do have quite dry skin so I thought this would be good.

The ingredients of the Full Cream are:
Purified water, Sweet almond oil, Olive fruit oil, Olive Squalene, Coconut oil, Cetearyl alcohol, Natural Vitamin E, Hydrollized milk protein, Aloe Vera leaf juice, Comfrey extract, Piroctone Olamine, Polysorbate 60 (food grade emulsifier), Honey, Apple cider vinegar and Hops extract.

So looking at all the ingredients above they all look natural and easily understood. It's paraben free and paraffin free and it is also fragrance free.

I have been using this moisturiser for around 4 weeks. I find that this moisturiser is quite moisturising but I am still finding that the skin on the sides of my nose are still dry and flaky (but not as much as before I used this moisturiser). One thing that did annoy me at the start was the smell. When I apply the moisturiser there is a noticeable smell. I don't know how to describe it other than it's sort of a milky smell or maybe an off milk which was a bit unpleasant. However now I don't notice this smell as much, probably because I am getting used to it.

The consistency of the moisturiser is quite thick but is still easily spreadable. You really don't need much at all. I usually use one pump and that's enough.


The price of this moisturiser is quite decent at AU$13.50 for 75ml. You can also get it in 250ml for $18.50 and instead of the pump bottle above, it comes in a jar.

Overall I think this moisturiser is quite alright. I find it hydrating and soothing for my dry skin and I find my skin feels soft and smooth after using this moisturiser. I don't know whether I will be repurchasing this again but I will keep using it until it's finished.

Monday, 18 March 2013

Antipodes Divine Face Oil - Organic Avocado Oil and Rosehip review


Today's review is on the Antipodes Divine Face Oil - Organic Avocado Oil and Rosehip. I purchased this a month ago on my trip to Wellington NZ. I purchased this along with the Grapeseed Butter Cleanser which I have reviewed last week here.

The Divine Face Oil claims that it has been scientifically shown to stimulate synthesis of collagen production in human skin cells by up to 51%. It also claims to lift tired, stressed and sun-damaged skin and help to reduce the appearance of lines, age spots and scars.

I've been using this oil for the past month now and I am loving it. My daily routine now involves applying 1-2 drops of the Divine Face Oil after cleansing and before applying moisturiser. I apply the oil both day and night. Some of you may ask - why do I use it during the day, wouldn't it be troublesome putting makeup over a face that's been covered in oil? The answer to that is no, I do not have any trouble at all applying makeup after applying this oil since it absorbs into the skin quite quickly. Even straight after application of this oil my skin does not feel oily or greasy.

After I started using this oil my skin feels more supple, healthy and hydrated. The oil keeps my very dry skin hydrated all day and all night long. I usually apply a few more drops at night time and in the morning I wake up with soft, smooth and hydrated skin. The oil definitely gives my skin that extra hydration boost that it needs especially I work everyday in a dry air conditioned building.

In terms of appearance of scars, I do have a couple of very light pimple scars which I got recently and I have found that these scars are disappearing slowly. I still can see a tiny bit of redness from the scar but it is not as bad as what it was before I started using this oil.

I love this oil and I will definitely be repurchasing. Even though it is a small bottle (30ml) I think this will last me at least a few months since I only need to use 1 - 2 drops per application.  Update: It's been a month since I posted this review and there is still over half a bottle left so it does last a long way.


Tuesday, 12 March 2013

Review: Antipodes Grapeseed Butter Cleanser

Around a month ago I went to visit my younger sister in Wellington, New Zealand. Before departing Wellington, I was browsing at the airport and I discovered the brand Antipodes. Antipodes sells organic skincare and makeup (I only found out about the makeup range on their website). I was just browsing their products at the airport and was not planning to buy anything but their products attracted me. After browsing for around 15 or so minutes, I ended up buying a couple of products, the Grapeseed Butter Cleanser and the Avocado oil and Rosehip Divine Face Oil. I also got a free hand cream with my purchase.

Anyway, this post will be about the Grapeseed butter cleanser. I will be reviewing the Avocado oil and Rosehip Divine Face Oil in a different post.


The cleanser comes in a jar. I know the first thing in mind that comes up is a jar?? That's unhygienic because you have to dip your hands/fingers in it and germs can go in the product. Well...this is not the case. The cleanser comes with a tiny little spatula to solve this problem.

Anyway to the product itself. The cleanser contains many nourishing and soothing ingredients such as cacao butter, olive oil, harekeke oil (antibacterial), Vinanza Grape extract (comes from New Zealand sauvignon blanc grape seeds to repair skin), lavender, blue chamomile and hibiscus flower.


To use the cleanser pick up the product using the spatula and massage all over your face (dampened, not wet). You really don't need to use a lot as it spreads really easily. When you first pick up the cleanser it feels quite solid but as you massage it on your face it becomes really silky and creamy. After you have massaged it all over the face and neck, rinse it off with a face cloth dampened with warm water. This cleanser really does remove all my makeup off including my eye makeup. After cleansing, my face feels thoroughly clean yet supple, soothed and moisturised.

I definitely recommend this cleanser and I will definitely be repurchasing this although this may last me quite a while.

And just to show you how good this cleanser is, see the photos below. I swatched several eyeshadows, bronzer, blush, eyeliner and foundation then I applied the cleanser and massaged it onto my skin. After wiping it off with a wet cloth all the makeup is removed. It's amazing!!!


Monday, 4 March 2013

HadaLabo GOKUJYUN Super Hyaluronic Acid Lotion - Product Review

I purchased the HadaLabo Super Hyaluronic Acid Lotion sometimes towards the end of last year after reading about it on BeautyHeaven forum. I got the 170ml bottle from Sasa.com for A$18.

I bought this product since I read rave reviews about it and that my skin is very dry and I was in need of extra hydrating skincare products.

About HadaLabo Super Hyaluronic Acid Lotion (from Hada Labo website):

  • Contains 3 types of Hyaluronic Acid to deeply moisturise skin and helps to preserve its optimum moisture balance.
  • Replenishes and locks-in moisture for complete hydration. Skin feels significantly soft and supple.
  • Helps improve dry and dehydrated skin, leaving it silky smooth.
  • Skin pH balanced. Low irritation.
  • Free of fragrances, mineral oil, alcohol & colorant.
The packaging of the product is simple. It has a flip-top lid/cap. To apply the product you only need to pour a small drop on the palm of your hands then gently pat on skin until absorbed. The consistency of this lotion is like water. When you first pat it on the skin you may feel a bit of stickiness but that goes away pretty quickly and the product just absorbs into your skin. I apply the lotion/toner day and night after cleansing and before applying serum and/or moisturiser.


After using this hyaluronic acid lotion for the last few months I have found my skin to be more hydrated and it keeps it hydrated all day. Overall I am very satisfied with this product and will definitely repurchase once I finish this bottle. I think it will last a while though as you do not need much at all to use daily.


Friday, 1 March 2013

EOTD #9 - MUFE Pink Beige

Since I purchased the Makeup Forever (MUFE) Aqua cream in pink beige I have been playing around with it. I have tried it on its own and as a base. Yesterday I came up with this look.


How I did the eye makeup look:

  1. I primed my eyelid up to the brow bone. This is optional. I think the MUFE Aqua cream last long without a primer but since I was using other eyeshadows I wanted to use a primer so that it last longer and makes it easier to blend.
  2. I applied  MUFE Aqua Cream in Pink Beige all over the lid and blend up slightly.
  3. I applied MAC Soft Brown all over the crease and blend.
  4. On the outer half of the eye I applied MAC Cross cultural on the crease and the outer V. 
  5. I lined my upper lash line thinly using Maybelline Master Precise eyeliner and winged it out slightly.
  6. I applied Revlon High Dimension Eyeliner in Bronze Flash on the lower lash line and then I used a small smudge brush and applied MAC Cross cultural on top to set and smudge the liner.
  7. Lastly, I applied MAC Haute & Naughty mascara to the upper and bottom lashes.
For my face, I did my usual routine:
  1. I applied L'Oreal Nude Magique BB Cream in Medium all over the face. 
  2. I then used Eco Minerals mineral foundation in Neutral Sand (this was a sample sachet I ordered from Eco Minerals). 
  3. I contoured my face using Eco Minerals bronzer in Holiday (also a sample). 
  4. I applied MAC Peachtwist blush on my  cheeks; and
  5. I finished off by highlighting the upper cheekbones by tapping a very tiny amount of MUFE Aqua Cream in Pink beige.
Hope you like this look!