Showing posts with label Swatch. Show all posts

Monday, 9 December 2013

Urban Decay Vice 2 Palette Review and Swatches

This is my first follow up post to my USA Trip hauls which I recently posted about - click here to visit.

I will be reviewing the Urban Decay Vice 2 Palette. When this first came out I immediately put it on my wish list for my trip coz it looks so pretty. I already have a couple of palettes from Urban Decay: the Original Naked Palette and the Fun Palette. And even though I already have tons of eyeshadows in many different colours I just had to get it. I actually purchased this before I even left Australia because UD had a 20% off Family & Friends sale so I took advantage of this and purchased the palette and sent it to my accommodation at my last stop in the States.

The RRP of this palette is $59 but with the 20% off it was $47.20. I thought this was a great price as it includes 20 eyeshadows and a double ended brush.


PACKAGING

Oh my gosh! I really love the packaging. It's a beautiful gorgeous marbled purple colour. The packaging is made from plastic I think but it feels sturdy. To open the palette there is a button you press and this gently opens the palette. 

The Urban Decay logo is a raised logo with diamond like stone..

There is a large mirror which is the same size as the palette so this is handy if you use this for travelling. 

EYESHADOWS

There are 20 eyeshadows in this palette and there is a variety of colours from blues, purples, pinks, greens and neutral.

The texture for most of the shadows were nice and smooth and the pigmentation for most of the colours were really good and they had good payoff. There were a couple that were less pigmented and were harder to swatch but I will mention it as I go through the swatches.

There were only 2 matte eyeshadows in the whole palette and they are Habit (nude/light beige) and Rewind (neutral brown).  The others were either metallic/frosted finish, satin finish or glittery/shimmers.
I liked most of the colours in the palette but it would've been nice if there were a couple or a few more matte shades or blending shades. 

BRUSH

The palette comes with a dual-sided synthetic brush, one to apply all over the lid and one for blending. With my original Naked Palette I really liked the eyeshadow brush that it came with because it was able to pick up and pack on the eyeshadows evenly. However with this one I did not really like the eyeshadow brush so much as I had to dip it into the colour several times. I liked the blending brush a bit  more though. It is different than other blending brush I have as it's quite narrow so it can apply colour more precisely on the crease. It does blend it nicely but I think if you want to blend it better you will need a fluffier brush.

SWATCHES

So here are the swatches. I took the photos row by row and I took photos of the swatches without and with flash. The top image is the swatches taken without flash and the bottom image is taken with flash.


Row 1: Smokeout, Lovesick, Shellshock, Coax and X-Rated

Out of the 5 eyeshadows in the first row, the last 3 (ShellShock, Coax and X-Rated) have the most pigmentation. I found Lovesick (the 2nd shade - matte black with micro-glitter) didn't have a great payoff and felt very dry. I had to swatch it several times to get the colour to turn up. Smokeout (dark chocolate brown with satin finish) was quite similar but not as bad. 

I wasn't sure about the pinks in this row but after trying it I actually quite like them. Coax was more shimmery and a slightly warmer pink than X-rated which is a satin finish.


Row 2: Prank, Madness, Strike, Stash and Poison

My favourites in this row are Madness and Strike.
I found that Poison was a little dry and you have to swatch it a few times to build up the colour. 


Row 3: Radar, Damaged, Voodoo, Betrayal and Derailed

I love the purples in this row. Betrayal is so gorgeous! It's a duo-chrome bright purple with lilac/blue shift. It's so gorgeous on its own or it works well with Voodoo (Purple with a metallic/frosty finish and glitter). I also love Radar, Damaged and Derailed, all of these colours had really great pigmentation and the texture is smooth and buttery. 


Row 4: Dope, Toxic, Habit, Ambush and Rewind

The last row contained neutral colours. This row has the 2 matte colours, Habit (a nude/light beige) and Rewind (neutral brown). Habit is great for highlighting the brow bone as it matches quite closely to my skin colour. These 2 matte colours has great pigmentation and the texture is so smooth and buttery.
Dope, Toxic and Ambush also had really great colour pigmentation. 


Overall I really like this palette and it's great value for what it costs. I highly recommend it if you are looking for a palette with many different colours or you love colourful eyeshadows. However if you are looking for a more wearable palette for work or everyday wear this might not be for you because there aren't too many neutral shades in this palette.  

Hope you enjoy this review and if you have any questions about this palette feel free to ask me in the comments. I will also try to post some looks and EOTDs using this palette.


Sunday, 14 July 2013

Rimmel Scandaleyes Waterproof Eyeliner and Barry M Eyeshadow Pencil Review and Swatches

So for the last few months I've been looking to buy the nude Rimmel Scandaleyes waterproof eyeliner. Unfortunately my local priceline did not stock this at all so I ended up purchasing this from ASOS. During the time of purchase they had 20% off so I also decided to buy a couple of extra items and I chose the Barry M eyeshadow pencil. I have never heard of the Barry M brand before until I saw them on ASOS... which is why I decided to give it a go.

So up for review today are:

  • 2 x Rimmel Scadaleyes Waterproof Eyeliner in Bronze and Nude
  • 2 x Barry M Eyeshadow Pencil in Gold Cream and Bronze

Top: Barry M Eyeshadow Pencil
Bottom: Rimmel Scandaleyes Waterproof Eyeliner

Top Left: Rimmel Eyeliner Nude      Top Right: Barry M Gold Cream
Bottom Left: Rimmel Eyeliner Bronze    Bottom Right: Barry M Bronze

So here are my thoughts on the Rimmel Scandaleyes Eyeliner. These pencils are really great. They have a creamy finish and the colours are very pigmented. Because they are creamy they apply really smoothly on the eyelids without tugging. They last really long too. On my upper lash line it lasts all day and on the bottom lash line and waterline it lasts around 4-5 hours before it starts fading slightly. It's really great to wear on its own as an eyeliner, but because it has a creamy finish you can apply it all over the lid as an eyeshadow base. I love using this eyeliner on the waterline because it is waterproof. The nude eyeliner is great to brighten the eyes by applying it along the waterline.

The Barry M eyeshadow pencils on the other hand didn't really work for me. I purchased it after reading great reviews on it on the web. Like Rimmel eyeliner, the colour is really nice and pigmented. The formula texture is also soft and creamy and applies really easily on the eyelid. However I found that this eyeshadow pencil creased after a couple of hours. Even after applying a powder eyeshadow over it still creases a bit. It may be because I've got really hooded eyelids which is annoying. So I am a bit disappointed but since it was only $6 each I think I will try to make it work. I may have to try it again by applying a couple of layers of powder eyeshadow over it.

So that's my thoughts on the Barry M eyeshadow pencils and Rimmel Scandaleyes eyeliner. Have you tried these products? Did you like them?

Saturday, 27 April 2013

Makeup Geek Haul - Red Cherry Lashes, MUG Gel eyeliner review & swatches

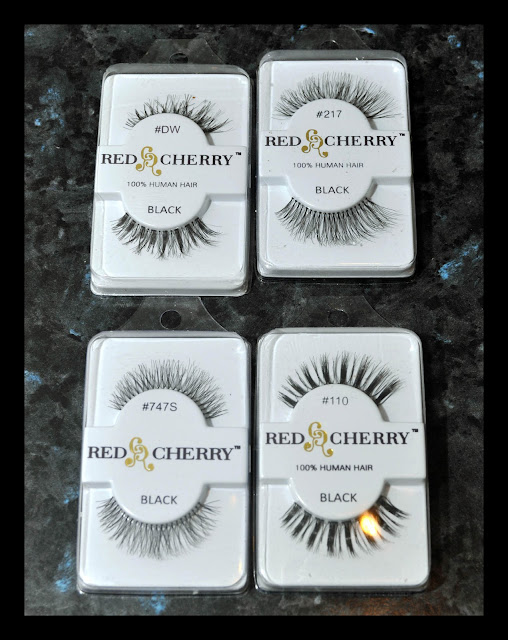
So I have been eyeing the Makeup Geek (MUG) Gel Eyeliner for a while now... to be honest.. from last year. And finally a few weeks ago I went for it and purchased 3 of them. In addition of these gel eyeliners, I also purchased 4 x Red Cherry lashes.

You may have heard of Makeup Geek. If you haven't, here's a little bit of info. Makeup Geek is a beauty website run by Marlena. I found out about her through her Youtube Channel. Previously she just had the channel and the website but then she started producing her own products such as these gel eyeliners. She also has eyeshadows as well and they come in a range of beautiful colours.

So the three MUG gel eyeliners that I purchased were: Fame (beautiful dark teal), Amethyst (gorgeous purple) and Rave (dark shimmery/metallic brown). They were very affordable at US$7.99 compared to MAC Fluidline which is around $32 (I think).

I also purchased some Red Cherry false lashes since I have read some good reviews about it and they were only U$2.50 each. I purchased the Demi Wispies, #217, #747S, and #110. So far I have used the #747S and they look really nice on and it looks quite natural. I will post the EOTD using these lashes in the next few days.


So onto the gel eyeliners. First of all, I love them!! These gel eyeliners are amazing! The colours are gorgeous, they are very pigmented and they are long lasting. Once I applied them, they do not budge. I think they also work great as a base. I have only tried using Rave as a base and it glides on smoothly. I do find that Fame (teal) was a bit more tacky but it still applies beautifully.


Out of these 3 colours, I still can't decide which one of them is my favourite because I love them all. I love Fame and Amethyst because the colours are so gorgeous. And I love Rave too because it's not just a plain brown but a beautiful metallic/shimmery brown. As you can see above, before I actually used Fame it looks quite dark and matte but after I applied a swatch the colour is a beautiful gorgeous teal!

Here is a look I did the other day using Rave. I don't think this picture does it justice but it's definitely a great alternative to the usual black eyeliner.


Overall I am very happy with my Makeup Geek haul. I am tempted to purchase more of the gel eyeliners and also the MUG eyeshadows which I've heard are really nice and pigmented. The shipping to Australia wasn't too expensive. Overall I paid around $45 for the above haul so it was a good value!

I can't wait to try more MUG products but I think I have to put myself on a spending ban for now... so until next time.

Monday, 1 April 2013

Review: Lancôme Teint Visionnaire Foundation

So I was lucky enough to be chosen to be a part of Beauty Heaven's trial team for the new Lanc ôme Teint Visionnaire Skin Perfecting Makeup Duo Foundation.

The Teint Visionnaire combines 2 products into one: a foundation and a matching concealer.
The foundation contains [LR 2412] which is the star molecule of Visionnaire Advanced Skin Corrector serum.  Lanc ôme claims the [LR 2412] works day after day to smooth wrinkles and refine pores and reduce the appearance of imperfections. The Teint Visionnaire contains 2% of the [LR 2412] molecule while the Visionnaire skin perfecting serum contains 4%.
The concealer/corrector is a high coverage corrector which claims to immediately reduce the appearance of dark spots, dark circles and imperfections.

I was very excited when I got chosen to try out this foundation because this is the first expensive/high-end foundation I've tried.


First of all the packaging of the foundation is quite unique and different to others I've seen. It does look a bit bulky but I don't tend to carry foundation in my handbag so I don't mind the look of the bottle at all.
I really do love that this is a 2-in-1 product. I love how the concealer is built into the bottle. It is located on the top of the lid off the bottle. You just flip the cap lid open and there's a small mirror inside which is quite handy.


The instructions says that you first apply the high coverage corrector then follow by applying the foundation. I did not follow this as I like to apply concealer after I apply foundation since I find that the concealer moves around if you apply it under the foundation.

The consistency of the foundation is thin but not too runny and it applies smoothly on the skin. The coverage of the foundation is light to medium. I like to apply it with a light coverage but you definitely can build it up to a medium coverage. The foundation nicely evens out my skin tone and gives me a natural finish. In addition I found that this foundation works really well with my dry skin. It's not drying at all, it doesn't make my skin look cakey and it feels very lightweight on my skin.

The foundation has an SPF factor of 20 which is higher than any other foundations I have used before.

Now the corrector formula feels very thick and heavy. I found that I need to warm it up with my fingers before I can apply it onto my skin. The corrector is definitely high coverage as I only needed to use a tiny bit to cover any imperfections. I don't have much imperfections on my skin but I have a few redness and scars from pimples and the corrector covers it perfectly. I also applied a tiny bit of the corrector under my eyes and even though it is a high coverage corrector I didn't find it looking cakey. The colour of the corrector is a perfect match with the foundation colour.

The shade that I received was 04 Beige Nature. Just to let you know the skin tone on my face and neck is lighter than my décolletage area and arms so I tend to use a foundation that is slightly darker so it blends in nicely all over. When I had to choose the shade for the foundation I went to David Jones and swatched the other range of Lanc ôme Foundation and the sales assistant matched me to 04 Beige Nature in Teint Idole. When I got the foundation I thought that it looked quite dark. However it does not look as dark after blending it with my fingers into the skin. When I apply the foundation onto my face I found that it worked better applying it with my fingers as it warms the product up and blended it nicely. If I apply it with a brush I found that it is a little bit too dark.


So does this product live up to its claims of skin benefits? Well, I have been using this foundation everyday for nearly a month now and in terms of skin benefits I can see that my pores look a bit more refined and my skin looks even and feels smooth. However other than that I haven't seen any other skin improvements as yet. I will definitely keep using this and hopefully in another month I can see the benefits that it claims to have.

Overall I really do like this foundation. It is lightweight and looks natural on the skin. The only downside was the colour was a bit hard to match. I did go to the store and tried on the lighter shades and I found they were too light so I think I was in between shades. I do find that I can get away with it if I blend it in really well into the skin and use a lighter colour face powder to set it.


Saturday, 30 March 2013

Mirenesse Lip Bomb #4 - Review and Swatch

I recently got some new lip products, even though I already have tons of lipsticks and lipglosses I just couldn't resist.

This review is for the Mirenesse Lip Bomb in shade #4 which retails for A$39. It is a gloss, stain and lip lacquer in one.

Product claims (from Mirenesse website): A satisfying NEW INNOVATION in lip colour; beyond gloss, stain or lip lacquer. Colour that drenches your lips for a juicy high impact colour that's feather-light and super-moist with a velvety finish. Power packed with a non-smearing pigment that lasts and lasts....


The colour that I got was #4 which is a bold bright pink.

The packaging is quite cute, it is a clear bullet shaped tube. The wand applicator is different from other lip glosses I own. It has the shape of an hourglass and I found it easy to apply the lip bomb.


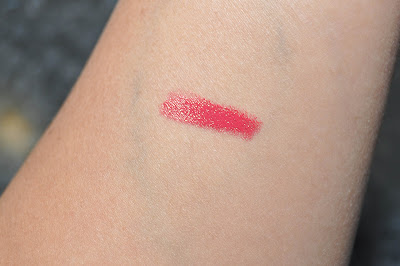
The lip bomb itself....Well.... can I just say the colour is absolutely gorgeous and is very pigmented. One swipe on the lips is enough to give you a nice opaque finish. The lip bomb gives a beautiful glossy sheen finish on the lips. The consistency is similar to that of a lip gloss and I don't find it overly sticky at all. The lip bomb has a nice minty scent which I found was quite pleasant.

I found that this lip bomb lasts on your lips for hours. I was quite surprised at how long it lasted considering I drink quite a lot of water in the morning. I found that with eating and drinking the lip bomb stayed on my lips for a good 2 - 3 hours. I would imaging that it would have lasted longer if I did not drink or eat. Even after it started fading, it leaves a nice stain on the lips.
There are a few negative points that I had found. The lip bomb does feather a bit so you have to really be precise at applying it on the lips because once you accidentally mess it up, it does stain the skin. I also found that my lips felt a bit dry after a couple of hours of applying the lip bomb. However I think I can overcome this problem by applying some lip balm before applying the lip bomb. And lastly the price in my opinion is a negative as it is quite expensive compared to other lip products in the market.

Overall I really do love this lip bomb as this is probably the most long lasting lip gloss I've tried. I would definitely love to try the other colours but the price is holding me back. I guess I will have to keep an eye out for when it goes on sale.

Sunday, 30 December 2012

December 2012 Bella Box and Savoir Faire Winter Kit Swatches


So I was really excited in getting the December Bella Box since I read on Beautyheaven forums that there was something in it that's worth $110. When I opened it I was happy with the contents.


There was only 1 full size product in the box and that was the Savoir Faire Limited Edition Kit in Winter. The other products that was in the box were samples. There was EmerginC moisturiser and cleanser, Allegra Rhodes Hand and Nail Cream (in Red Lychee), John Frieda Frizz-Ease Secret Weapon Finishing Creme and Compeed blister patch.

So far I have only tried the hand cream and the Savoir Faire Kit. The hand cream is nice and has a beautiful lychee scent.  I'm not sure if I will buy the full size though since I already have plenty of hand creams

Now, the Savoir Faire Winter Kit. The kit contains 6 eyeshadows, a blush, a sheer lip gloss, a black mini pencil eyeliner and a mini mascara.


This is the ingredients list:
The kit also came with 3 day to night face charts but I haven't tried them yet. I have however used the eyeshadows with other eyeshadows. The only item I haven't tried is the mascara.

I have swatched the eyeshadows and blushes and they are pigmented and the colours are beautiful. I think if you want to experiment and play around with colours, this is the palette to go too. The only neutral colour is Devout which is a creamy golden colour.


Eyeshadow swatches with flash: Devout, Spicy, Kinetic, Liberating, Immortal and Vivacious

Eyeshadow swatches without flash: Devout, Spicy, Kinetic, Liberating, Immortal and Vivacious
The blush was a really lovely soft pink colour and it's pigmented too but you can apply it sheerly and build it up as desired. It's got a slight shimmer to it (you can see it in the swatches with flash).

Blush swatch without flash

Blush swatch with flash
So that's December Bella Box. This is my second box I've received since I started subscribing in November. I'm not sure if I  will continue the subscription for long. I think I will cancel it after I receive the January box. Even though I've been happy with what I've received, I think I need to use up all the products that I have before piling up my shelf with more products.

Friday, 7 December 2012

Revlon Just Bitten Kissable Balm Stain - Adore and Lovesick

So I have been waiting for the Revlon Just Bitten Kissable (JBK) Balm Stain to arrive in Australia. When it finally arrived I purchased 2 colours from Priceline and luckily they had a 2-for-1 offer. The 2 colours I bought were Adore and Lovesick. Adore is a brick coloured red while Lovesick is a bright fuschia pink.


Here are some swatches.

Top: Swatches with flash; Bottom: Swatches without flash
So these balm stain looks a lot like Clinique Chubby Stick but at half the price. The RRP in Australia is $17.95. It is cheaper than Clinique Chubby Stick which retails for $35 but I think it's still pretty pricey for Revlon especially when in the US they are selling it for around $8 or $9.  Although the Revlon JBK Balm stain looks a lot like the Clinique chubby stick, the Clinique chubby stick doesn't leave a stain, where as the Revlon JBK does.

Another difference that I found is that Clinique chubby stick seems to be a bit more moisturising than the Revlon. The revlon is moisturising when you first apply it but as time goes by it dries a bit so it's worth applying some lip balm or paw paw ointment before or even after applying the stain.

The Revlon JBK balm stain has a pepperminty smell that is definitely noticeable when you apply it. I don't mind it but some might not like it as it can be quite strong. The colour is buildable. You can just apply a sheer tint or you can build it up to a more opaque colour. And the stain does definitely last. I found that it lasted for about 3 hours even after drinking.

Overall I really love it! I think I love it more than the Clinique Chubby Stick as the colour last longer. My favourite is Adore. I like Lovesick but it can be a bit bright for everyday lip colour. I am planning to buy a couple more colours and will post some swatches when I get them.

Note: There are 2 colours that are not sold in Australia and those are Crush and Rendezvous.

Left: Lovesick      Right: Adore