Showing posts with label Product review. Show all posts

Sunday, 20 July 2014

Redken Intra Force Review - Shampoo and Treatment

Last month I was approached by a representative from  RY.com.au to try out the products that they sell in the store. RY.com.au is one of Australia's largest online hair care and beauty store. They are an authorised seller too so you don't have to worry about whether you are buying a fake product. They also offer free returns and price match other stores.
Since RY.com.au is a large online store and they sell a variety of brands and products from makeup to hair care I could not decide what to get. However, the representative was very helpful and suggested the Intra Force for my thinning hair. 

DISCLAIMER: The products being reviewed in this post was provided to me by RY.com.au. However all my post are of my own opinion and is not affected by any sponsors.

My hair  is very thin and fine and that I tend to get some hair loss as well.  So for the last 3 weeks I've been trying out some new hair products that claims to help with hair loss and thinning hair. It's the Redken Intra Force. 


Redken Intra Force Shampoo Ingredients
Redken Intra Force Treatment Ingredients
The Redken Intra Force range contains 3-step products: Shampoo, Toner/Conditioner and the Treatment. This range claims to improves hair condition and promotes thicker fuller hair in 30 days. The 3 key ingredients in this range are Aminexil (increases hair growth and extends lifespan of hair), Agrinine (Improves microcirculation) and Zinc PCA (removes excess sebum and DHT).

Now RY.com.au have been kind enough to give me the Shampoo and Treatment from this range. So I have been using these 2 products for the last 3 weeks. Usually  I only shampoo my hair once or twice a week but when I started using the Redken Intra force range, the directions for the treatment was to use it at least 3 times a week or more. Having used these 2 products as per directions, I haven't noticed much difference in my hair. I am still getting hair loss and I haven't noticed any difference in the thickness of my hair. I am not sure whether it is because I should be using all three products (including the toner which I do not have) or whether I need to use these products more than 3 times a week. I still haven't used the products for 30 days yet, however I would think that I should be able to notice any thickness and hair growth if the product is working. Another thing I found was the shampoo made my hair a bit drier than usual. 

I really wanted to like these products and was really hoping that it would help with my thin hair and  would thicken my hair. However I feel that I am not getting the results that I am expecting. I will continue to use these products and will give another update in around a month or so.

Have you used Redken Intra Force products before? Do you know any other good products that can help with thinning hair?

Tuesday, 1 July 2014

My current daily mascara routine - Tarte Light Camera Flashes and Benefit They're Real

So today I wanted to talk about my daily mascara routine and review the mascara I've used. I don't tend to stick with the same brand mascara unless I really really love it. I do have some favourites that I have repeatedly used and one of them is Benefit They're Real which is going to be covered in this post today.

For the last 2.5 months i have been using 2 mascaras, Tarte Light Camera Flashes (small sample tube which I got as a gift from Sephora) and Benefit They're Real (also a sample size from Benefit mascara swap).

So the reason I've been using 2 mascaras instead of just one is because I started out just using the Tarte one and it did give me nice long lashes but didn't give any volume. So after about a month I started using Benefit They're real which I've previously used on its own. The combination of the 2 mascaras gives me long thick lashes. 

Before I apply these 2 mascaras, I always curl my lashes with my Shu Uemura lash curler which I love! I sometimes heat it up using hair dryer to make the curl more intense.


I then apply Tarte mascara first, to the top lashes only and then I apply a second coat with the Benefit mascara. As you can see from the mascara brushes (below) the 2 mascaras have slightly different brushes. 


Below in the first photo you can see my natural lashes without mascara, then the 2nd photo on the top is after applying Tarte mascara. Then as you can see after the 2nd coat (in the 1st pogo on the bottom) using the Benefit mascara I get long thick lashes. It really helps to open up my eyes, especially since I have hooded eyes.


I really like the Benefit mascara as on its own it does give me defined and volumised lashes. The Tarte mascara on the other hand focuses more on lengthening the lashes. I also found that the formula of the Tarte mascara dried out very quickly within the first month. I don't think I would purchase the Tarte mascara especially on its own. If I had to choose between the 2, Benefit definitely wins but using both together actually works really well.

Once I have reached the 3 months use of these mascaras I will be using another mascara, so when that time comes I will post another review.


Friday, 20 June 2014

Review: theBalm Mary-Lou Manizer Highlighting Powder

Highlighting powder or highlighter is an additional step in my makeup routine that I've been adding. Usually after applying foundation, I finish off my face using powder, blush and contour powder/bronzer. I have previously used highlighters before, but mainly in liquid or cream form like Benefit High Beam or Mac Cream Colour Base in Hush. I have been wanting to get a powder highlighter for a while now but couldn't decide because there were many options and sometimes I thought it would be cheaper to just use an eyeshadow as a highlighting powder. However, after a while I gave in and went to buy one.

I've heard a lot about theBalm cosmetics and have always passed the counter in my local David Jones. After a lot of thoughts and reading reviews I went ahead and purchased theBalm Mary-Lou Manizer Highlighter.

First of all I just want to say I love the packaging of theBalm cosmetics. It's just so gorgeous. And the names they give their products are so innovative and fun! The highlighting powder comes in a little compact with a mirror. The size of the product is 8.5grams. There's quite a lot of product there so I think this powder will last me a long time. The cost of this highlighter is AU$34. It is quite pricey but since it will last quite a long time because there is a lot of product it isn't too bad. I actually bought this online from the US so I was able to get it slightly cheaper.


Mary-Lou Manizer is a honey/golden beige coloured powder. The texture of the powder is so soft and buttery and is extremely pigmented. There is a lot of shimmer but it does not contain any chunks of glitter. Because of the highly pigmented shimmer you really do need to apply this powder light-handedly especially for wear during the day.


On the pack it says you can use this powder as a highlighter, shimmer or eyeshadow. I have been using this now for the last couple of weeks and I have used it both as a highlighter and an eyeshadow.
I love using it both ways. As eyeshadow I use it as the all-over lid colour, to highlight the inner corner of my eyes and to highlight the brow bone. I do need to apply it very very lightly though when I use it to highlight my brow bone. This has not replaced my favourite Urban Decay eyeshadow Sin which I always use as a lid colour and inner corner and brow highlighter (I still love Urban Decay Sin though).

As a cheek bone highlighter this is just gorgeous. It really does shimmer in the sun and highlights your cheekbones.


As you can see above, I have applied it with a very light hand so you can see the shimmer subtly. If you want to amp it up for night time you can apply a bit more. I applied this with a small stippling brush or with a real techniques contour brush.

Overall I really love this highlighter. It adds that shimmer and beautifully highlights my cheek bones. I love it as an eyeshadow too. Before getting this highlighter was an optional product in my daily make up routine but now I just cannot skip it!!


Monday, 9 December 2013

Urban Decay Vice 2 Palette Review and Swatches

This is my first follow up post to my USA Trip hauls which I recently posted about - click here to visit.

I will be reviewing the Urban Decay Vice 2 Palette. When this first came out I immediately put it on my wish list for my trip coz it looks so pretty. I already have a couple of palettes from Urban Decay: the Original Naked Palette and the Fun Palette. And even though I already have tons of eyeshadows in many different colours I just had to get it. I actually purchased this before I even left Australia because UD had a 20% off Family & Friends sale so I took advantage of this and purchased the palette and sent it to my accommodation at my last stop in the States.

The RRP of this palette is $59 but with the 20% off it was $47.20. I thought this was a great price as it includes 20 eyeshadows and a double ended brush.


PACKAGING

Oh my gosh! I really love the packaging. It's a beautiful gorgeous marbled purple colour. The packaging is made from plastic I think but it feels sturdy. To open the palette there is a button you press and this gently opens the palette. 

The Urban Decay logo is a raised logo with diamond like stone..

There is a large mirror which is the same size as the palette so this is handy if you use this for travelling. 

EYESHADOWS

There are 20 eyeshadows in this palette and there is a variety of colours from blues, purples, pinks, greens and neutral.

The texture for most of the shadows were nice and smooth and the pigmentation for most of the colours were really good and they had good payoff. There were a couple that were less pigmented and were harder to swatch but I will mention it as I go through the swatches.

There were only 2 matte eyeshadows in the whole palette and they are Habit (nude/light beige) and Rewind (neutral brown).  The others were either metallic/frosted finish, satin finish or glittery/shimmers.
I liked most of the colours in the palette but it would've been nice if there were a couple or a few more matte shades or blending shades. 

BRUSH

The palette comes with a dual-sided synthetic brush, one to apply all over the lid and one for blending. With my original Naked Palette I really liked the eyeshadow brush that it came with because it was able to pick up and pack on the eyeshadows evenly. However with this one I did not really like the eyeshadow brush so much as I had to dip it into the colour several times. I liked the blending brush a bit  more though. It is different than other blending brush I have as it's quite narrow so it can apply colour more precisely on the crease. It does blend it nicely but I think if you want to blend it better you will need a fluffier brush.

SWATCHES

So here are the swatches. I took the photos row by row and I took photos of the swatches without and with flash. The top image is the swatches taken without flash and the bottom image is taken with flash.


Row 1: Smokeout, Lovesick, Shellshock, Coax and X-Rated

Out of the 5 eyeshadows in the first row, the last 3 (ShellShock, Coax and X-Rated) have the most pigmentation. I found Lovesick (the 2nd shade - matte black with micro-glitter) didn't have a great payoff and felt very dry. I had to swatch it several times to get the colour to turn up. Smokeout (dark chocolate brown with satin finish) was quite similar but not as bad. 

I wasn't sure about the pinks in this row but after trying it I actually quite like them. Coax was more shimmery and a slightly warmer pink than X-rated which is a satin finish.


Row 2: Prank, Madness, Strike, Stash and Poison

My favourites in this row are Madness and Strike.
I found that Poison was a little dry and you have to swatch it a few times to build up the colour. 


Row 3: Radar, Damaged, Voodoo, Betrayal and Derailed

I love the purples in this row. Betrayal is so gorgeous! It's a duo-chrome bright purple with lilac/blue shift. It's so gorgeous on its own or it works well with Voodoo (Purple with a metallic/frosty finish and glitter). I also love Radar, Damaged and Derailed, all of these colours had really great pigmentation and the texture is smooth and buttery. 


Row 4: Dope, Toxic, Habit, Ambush and Rewind

The last row contained neutral colours. This row has the 2 matte colours, Habit (a nude/light beige) and Rewind (neutral brown). Habit is great for highlighting the brow bone as it matches quite closely to my skin colour. These 2 matte colours has great pigmentation and the texture is so smooth and buttery.
Dope, Toxic and Ambush also had really great colour pigmentation. 


Overall I really like this palette and it's great value for what it costs. I highly recommend it if you are looking for a palette with many different colours or you love colourful eyeshadows. However if you are looking for a more wearable palette for work or everyday wear this might not be for you because there aren't too many neutral shades in this palette.  

Hope you enjoy this review and if you have any questions about this palette feel free to ask me in the comments. I will also try to post some looks and EOTDs using this palette.


Thursday, 10 October 2013

Bomb Cosmetics Reviews - What a Melon Intense Lip Treatment and Pout Polish Gentle Lip Scrub

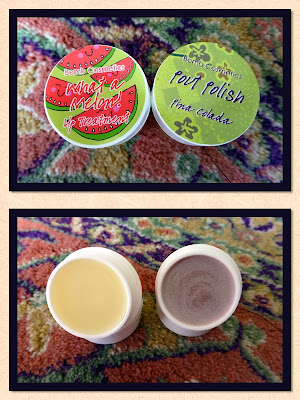
So following my recent post on Bomb Cosmetics, here is a review on both the Bomb Cosmetics "What a Melon Intense Lip Treatment" and the "Pout Polish Gentle Lip Scrub". I purchased these 2 products from GetDrenched.com.au.

After discovering Bomb Cosmetics from Beauty Heaven I am just addicted to their products particularly their solid butter bar and the cleansing shower butters. I haven't tried their lip products before so I purchased these 2 to see what they're like.

I own a few stick lip balms and I also use pawpaw ointment to moisturise my lips.. but some of my lip balms leave my lips with residue even though they are moisturising.


Pout Polish Gentle Lip Srub

I've used a lip scrub before from Lush but I didn't like it as it's quite rough on the lips. Well..this gentle lip scrub is definitely gentle. Not only that, the smell of the this lip balm is just scentsational (get it *wink* *wink*).


As you can see in the picture above, the pout polish has very tiny fine grains that exfoliate the lips. It is a bit hard to take out with your fingers but if you leave your fingers for a minute to warm up the product then you can usually slide a tiny amount of the pout polish to apply on the lip. You don't need much at all. The grains are really fine but I can definitely feel it exfoliating my lips. The polish also contains shea butter so it not only exfoliates but also moisturises the lips at the same time. 

The scent of this pout polish is just scentsational!! It's got a pina colada scent and everytime I apply this I just want to eat it coz it smells so delicious! 

The pout polish costs $6.95 which is a great price coz I think this will last me a while. It's a product I now carry in my handbag coz I love it so much!

What a Melon Lip Treatment

This lip treatment is beautiful. It's now my favourite lip balm! It leaves my lips so moisturised and soft. It lasts quite a while too but because of the juicy melon scent I love applying this regularly. I love how it doesn't feel sticky and just glides when you apply it on the lip. I also love how it doesn't leave yucky residue which some lip balm does to my lips after a few hours of application.

This lip treatment costs the same as the pout polish. I am so glad I got this lip balm because it is just amazing! Both the pout polish and lip treatment are now my handbag essentials!

So if you haven't tried Bomb Cosmetics products yet I strongly suggest you to check them out at GetDrenched.com.au.


Sunday, 8 September 2013

Nude Cleansing Oil Review

So you may have seen my post a few weeks ago when I went to Mecca Cosmetica to get the Kate Sommerville oxygen facial. As I mentioned in that post I purchased a product with the redeemable $50 booking fee for the facial. Because there were so many products I was so overwhelmed and I also wanted to get a product which was natural and did not contain parabens or any other nasties. So in the end I got the Nude Cleansing Oil. The price was $58 for a 100ml bottle. I thought it was quite expensive but since I got a free facial I thought it was ok for a one-off purchase.


The Nude cleansing oil claims that it instantly dissolves even the most stubborn waterproof make-up, rinsing effortlessly for soft, clean and comfortable skin. This cleansing oil is free from parabens, sulfates, PEGs, TEA, DEA, propylene glycol,  phthalates, synthetic colour and fragrance, mineral oil and silicones. 

Because of the ingredients I thought this cleansing oil would be great for my skin since it contains natural ingredients without any nasties. To use the cleansing oil the package direct you to use 2-3 pumps and warm the oil between the hands and massage onto dry face and around the eyes. Apply warm water to form a light milk and then rinse clean.

When I pump the oil out, the oil consistency is very thick. I have used a couple of cleansing oil before, MAC Cleanse off oil and Shu Uemura cleansing oil. Comparing the Nude oil with these two other products i think the consistency is much more thicker. 

I have been using the cleansing oil above for the last 3 weeks. Before reviewing a product I want to use it for at least 2 weeks so I can give my honest opinion. 

So does this cleansing oil really live up to its expensive price??

As pictured below I applied powder and cream eyeshadows, foundation and bronzer on my hand and applied the oil (please excuse my very dry hands). As you can see it barely emulsifies. It just looks like milky water. Once I wiped it off it did remove most makeup but it still left traces of it. As you can see it didn't completely remove the Maybelline color tattoo (turquoise/teal). 


So in my honest opinion when I cleanse my face with this oil I did not find it cleansing enough. It did remove my makeup but I did not feel it cleansed my skin. Even after using this oil I wiped my face with a toner sprayed on a cotton pad and I can still see traces of foundation left. So I always had to cleanse again afterwards using my usual cleanser, Antipodes Grapeseed Butter Cleanser. 

I also found that the oil didn't emulsify that well. When I applied water it does look creamy milky but it does not emulsify like MAC cleanse-off oil.  I also found that I need around 5 pumps to actually be able to apply it all over my face, not the 2-3 pumps as directed on the bottle.

After cleansing with the nude oil, my face actually feels quite dry and tight. I am not sure why because I thought since it is oil it wouldn't dry my face, but that wasn't the case.

Overall I do not think that this cleansing oil is worth the RRP $58 price tag. It is way overpriced for what you get. It is not cleansing enough and it made my skin feel tight and dry.
I think you can find better cleansers for this price tag. Or even better, the Shu Uemura cleansing oil and MAC Cleanse off oil are so much cheaper at $39 for 150ml. You get more for less!
But since I did purchase this cleanser for $58, I think I will have to try and keep using it until I finish the bottle so I get my money's worth. I think this product definitely goes in my "products I regret purchasing" list.


Thursday, 15 August 2013

E.L.F. Studio High Definition (HD) Powder Review

Along with my recent purchase of the EcoTools Face and Body Sculpting Powder, I purchased the E.L.F. Studio High Definition Powder for US$5.99.

I have heard of E.L.F. Cosmetics before but I have never purchased or used any of their products. Since my setting powder (MAC Mineralize Skinfinish Natural) was all used up I thought I will give this HD powder a try.

This is the product description from E.L.F. cosmetic's website:
The high definition loose powder creates a "soft focus" effect to the skin. Masks fine lines and imperfections for a radiant complexion. The incredibly soft and invisible powder is great for on-screen and everyday wear.
So reading the description above it doesn't really say that it's a setting powder. However, I think that this powder can be worn on its own or over a foundation.


So I have been using this powder now for the last week. I have used it on its own and I have also used it over my liquid foundation and over BB creams. 

I found that after applying this powder over my foundation my face feels so soft and smooth. It makes the skin surface feels so smooth and even. It does set my foundation and provides a smooth base for applying blush and bronzer. I also applied this powder at the last stage of my makeup application, which was after contouring, applying blush and bronzer and it gives me a beautiful result. The finish that it gives is a semi-matte finish. It does not look cakey on my normal/dry skin. However, you do need to be careful as you can over-apply this powder. I only use the tiniest amount and I apply it with a powder brush rather than using the puff provided with the powder.

In terms of oil control, I can't say much about this as I have normal/dry skin. 

I also did try to apply this on its own, however because the powder is so fine it did barely anything to my skin. There was no coverage and it definitely did not mask any imperfections. So I found that this powder works better as a setting powder to apply over foundation or to finish off the makeup over foundation, blush and bronzer. It just help to finish my makeup application by smoothing the skin and set all my makeup.

Did E.L.F. HD Powder deliver on its claims? I think so. Overall, for $5.99 I think it's definitely a great buy. I really like that the powder is quite fine and it sets my foundation nicely without having to use a lot of the powder. I am not sure how this compare with the MakeUp Forever (MUFE) HD Powder which cost quite a lot more but I'm sure that this is probably a great alternative to the MUFE HD Powder.

Monday, 12 August 2013

EcoTools Face and Body Sculpting Brush Review

A few weeks ago I went on iHerb and bought a few things from there. My purchases include organic green tea, lip balms and EcoTools Face and Body Sculpting Brush. I also purchased the E.L.F. Studio HD Powder which I will review in another post.

Today I will review the Face and Body Sculpting Brush. This brush cost me US$9.97 from iHerb. It's definitely a good price for a nice quality brush.

I purchased this because I thought it looked similar to the Rae Morris Radiance brush which is very expensive. However when the brush arrived it is actually bigger and thicker than the Rae Morris Radiance brush, so it's definitely not a dupe. However,  I still love this brush.


EcoTools is a great brand. It's a cruelty free brand. The brush bristles are made using cruelty-free synthetic taklon  bristles and the handle is made from bamboo. The bristles are so soft and feels so beautiful on the face.

I originally thought this brush is like the Radiance brush by Rae Morris which can be used for contouring the cheeks. However the bristles are quite dense and thick so it is too big to do precise contouring of the cheek. It may work if you squeeze the bristles to make it thinner but I think it's way too much work if I am in a hurry in the morning.

So how do I use this brush?

I really love using this brush to apply my foundation. Usually I have been using the Real Techniques face brush to apply my foundation but when I use this face and body sculpting brush, it applies foundation so fast and easily. It has cut my foundation application time by half. And because it is so dense it buffs in the foundation nicely into my skin. I use a sweeping motion side to side when I apply the foundation all over my face and on my nose I do a up down sweeping motion. And as it's a face and body sculpting brush, I can easily blend my foundation down to my neck and décolletage.

This blush is also great for applying powder all over the face. And lastly, although it may not be fully suitable for cheek contouring, this brush is great for applying bronzer all over the face. I also use this brush to contour around my jawline, my neck and my décolletage.

Overall I just really love this brush. I am amazed how versatile it is. It's definitely a great addition to my brush collection and at US$9.97, you can't go wrong with it!


Wednesday, 24 July 2013

Bomb Cosmetics Haul and Review!

So I have been bad once again. I was not going to buy any more things online but then I went on BeautyHeaven forums and there was a dedicated thread to Bomb Cosmetics. Of course I was curious as I have not heard of this brand before. So I followed this thread for a few days. Then I found out that Beauty Heaven members got a special offer (Free shipping and spend over $50 and get 6 free bath creamers and mallows) from GetDrenched.com.au, Bomb Cosmetics Australian stockist. I was more curious because I read really good reviews and raves about their products. So I gave in and decided to take up the offer.

So here is my first haul (Note "first" which meant I went back for more lol):


The products that I ordered were:

Because I spent just over $50, Bomb Cosmetics included 6 free bath creamers and mallows with my order.  I'm still trying to figure out what they all were but I could only identify a few of them. From top to bottom, left to right: 1. Lemon Express Bath Mallow;  4. Feel the Love Bath Creamer; 5. Blackberry Bath Creamer; 6. Crazy after dark Bath Blaster.

I also think the 3rd one on the top is Pearly King Bath Creamer because I have used that one because there were bits of pearls and juniper berries in my bath when I used it. I really loved Bomb Cosmetics bath creamers. They are full of beautiful essential oils, cocoa and shea butter and once you drop them in the warm bath it slowly releases its moisturising properties. The fragrance is subtle but still enough for you to smell the beautiful oils and relax as you bath in hot warm creamy water. Once I got out of the bath my skin felt so moisturised and soft. Prior to having a bath last weekend, I have not used my bath tub for years because I didn't have time and didn't think I enjoyed bath that much. However, after using Bomb Cosmetics bath creamers, I can't wait to jump in the bath tub again!

Now, on to the 3 products I ordered. 

First, the Skin Therapy solid butter bar. What can I say - this is an AMAZING product! I really love this nourishing solid butter bar. It might not be clear from the picture but I love that it has a ribbon attached to it so I can hang it in the shower. I apply this solid butter bar all over my body while I'm in the shower with the water running. As you apply it, the butter slowly melts onto the skin and you can see water beads run over the skin. This solid butter bar also contains small cranberry seed which just washes off as you apply it in the shower. This solid butter bar is very moisturising. My skin, especially my legs are really dry and in winter it gets even drier, flaky and scaly. However after using this butter bar my skin is moisturised all day long without the need of applying additional moisturiser. 

I purchased the Frankincese organic face treatment to add to my night time skin care routine. I have only just used it for 2 days so I can't comment much yet on it.  However I do love this product. It is organic and contains all natural ingredients. This face treatment is an oil treatment which is applied at night after cleansing. The treatment oil contains many kinds of oils including macadamia nut, evening primrose, frankincense, lavender and neroli oils. This treatment may be a bit too greasy for those with oily skin but perfect for those with dry skin. This oil really hydrates my dry skin leaving my skin soft, smooth and supple.

Lastly, the Mandarin & Orange Cleansing Shower Butter isn't like your normal shower gel. The consistency is semi-solid, like butter but it is easily scoopable with your fingers. I only need to scoop a tiny amount and put it on my loofah and it foams really nicely. Now the fragrance wasn't what I was expecting. I was expecting more citrusy smell but I found the fragrance was more like a room fragrance spray. Other than this I love everything else about the product. Because Get Drenched has such a wonderful customer service, the owners Paul & Liz have offered to provide me with another choice of cleansing shower butter. I decided to go with Pina Colada as I love the smell of pineapple and coconut. I will be reviewing this in another post.

So I am really happy with my order from GetDrenched.com.au. As I said the customer service is just amazing. Paul and Liz are very quick to respond to my emails and answered all my questions. I just love buying from GetDrenched because of the customer service and the amazing products that they offer. I am sure I will be making more purchases by the end of this month to take up their amazing offer.

Have you tried Bomb Cosmetics? 


Monday, 15 July 2013

Origins Drink Up Intensive Overnight Mask Review


So if you've seen my recent post on a haul from Mecca Cosmetica you would've seen that I had purchased the Origins Drink Up Intensive Overnight mask. I've been lusting for a hydrating mask and have been reading various reviews on various products. I had 2 on my final list which were this mask and the Kiehl's Ultra Facial Hydrating Overnight mask. After trying a sample of both mask I went ahead with the Origins because it is a really great mask and the Kiehl's one stung my skin around my nose a bit when I applied it.


I've got normal/dry skin but in winter it does tend to get drier because of inside heating in the office and home so I usually like to get extra hydration. My skin also tends to get dry and flaky around my nose. That is why I wanted to add Origins Drink Up Intensive mask to my routine.

The mask comes in a 100ml tube at a cost of AU$34. It does seems quite expensive but I think it's worth the cost as you only need just a bit more than pea size amount to apply all over the face. The packaging is quite simple, a bright green tube. I don't mind it being in a tube as it's more hygienic than having it in a jar (which is what the Kiehl's Hydrating Overnight masque is stored in).

The texture/formula of the mask is quite similar to that of a thick moisturiser. However it's not too thick so it is still easily spreadable all over the face. Applying the mask is very easy. You just need to squeeze a dollop of the mask and apply a thin layer all over the face. As you can see above, after around 5-10 minutes the mask absorbs into the skin and it looks like you are not wearing the mask at all. The instructions say that you can tissue off the excess if needed but I found that I didn't really need to do this. The mask absorbs quite quickly into my skin so I was not worried about it leaving any greasy residues on my pillow or my sheets.
As you apply the mask on the face it has quite a strong fruity scent, but I didn't mind this at all. Some may be put off by the smell so if you are interested in trying this, it may be best to try a sample.

So was the results good? I am definitely happy with the results this mask gave me. It really does hydrate  the skin. When I wake up in the morning, my skin feels so hydrated and plump. I also found that my skin has stopped flaking and drying around my nose. I now have used this for around 2 weeks and I can see an improvement in my skin and complexion. I have incorporated this into my night time routine twice a week and apply this mask after cleansing. If I need extra boost of hydration, I still apply my facial oils prior to applying the mask.

Overall I am very happy with this mask as it has given me great results. It may seem pricey but you do get quite a lot (100ml) and it does give a great hydrated skin so it's definitely worth the price.

Have you tried this mask before?

Sunday, 14 July 2013

Rimmel Scandaleyes Waterproof Eyeliner and Barry M Eyeshadow Pencil Review and Swatches

So for the last few months I've been looking to buy the nude Rimmel Scandaleyes waterproof eyeliner. Unfortunately my local priceline did not stock this at all so I ended up purchasing this from ASOS. During the time of purchase they had 20% off so I also decided to buy a couple of extra items and I chose the Barry M eyeshadow pencil. I have never heard of the Barry M brand before until I saw them on ASOS... which is why I decided to give it a go.

So up for review today are:

  • 2 x Rimmel Scadaleyes Waterproof Eyeliner in Bronze and Nude
  • 2 x Barry M Eyeshadow Pencil in Gold Cream and Bronze

Top: Barry M Eyeshadow Pencil
Bottom: Rimmel Scandaleyes Waterproof Eyeliner

Top Left: Rimmel Eyeliner Nude      Top Right: Barry M Gold Cream
Bottom Left: Rimmel Eyeliner Bronze    Bottom Right: Barry M Bronze

So here are my thoughts on the Rimmel Scandaleyes Eyeliner. These pencils are really great. They have a creamy finish and the colours are very pigmented. Because they are creamy they apply really smoothly on the eyelids without tugging. They last really long too. On my upper lash line it lasts all day and on the bottom lash line and waterline it lasts around 4-5 hours before it starts fading slightly. It's really great to wear on its own as an eyeliner, but because it has a creamy finish you can apply it all over the lid as an eyeshadow base. I love using this eyeliner on the waterline because it is waterproof. The nude eyeliner is great to brighten the eyes by applying it along the waterline.

The Barry M eyeshadow pencils on the other hand didn't really work for me. I purchased it after reading great reviews on it on the web. Like Rimmel eyeliner, the colour is really nice and pigmented. The formula texture is also soft and creamy and applies really easily on the eyelid. However I found that this eyeshadow pencil creased after a couple of hours. Even after applying a powder eyeshadow over it still creases a bit. It may be because I've got really hooded eyelids which is annoying. So I am a bit disappointed but since it was only $6 each I think I will try to make it work. I may have to try it again by applying a couple of layers of powder eyeshadow over it.

So that's my thoughts on the Barry M eyeshadow pencils and Rimmel Scandaleyes eyeliner. Have you tried these products? Did you like them?

Thursday, 11 July 2013

The Body Shop Haul & Review - Dreams Unlimited Body Butter and Eau de Parfum

So around a month ago during the Queens Birthday Long Weekend I went for a long weekend trip to Wellington, New Zealand. this was my second trip to Wellington. I just love this city! My main reason for visiting though was to visit my lil sister.

Anyway, during my trip I passed the Body Shop on Cuba Street and I saw that they had 60% off sale on some items. There were not much left but there were still a few range of products from lipgloss, a few makeup products, Cherry blossom perfume and the Dreams Unlimited body butter, body lotion and  perfume. At the end I purchased the Dreams Unlimited body butter and eau de parfum.


So on to the review!

The Dreams Unlimited Eau de Parfum features notes of citrus, green chilli, white flowers and cedarwood. I love the smell of this perfume as it is not strong or overpowering. I find the smell very sweet and also has a light floral smell. The fragrance lingers around for quite a long time which is great so you definitely don't need to apply this too often during the day.  It definitely complements the body butter and the two combined together makes the fragrance linger around for longer. The body butter comes in a tub like all the other body butters that the body shop sells. It's very moisturising and I only need to use a tiny amount. It also absorbs into the skin quite quickly. The fragrance of the body butter is the same as the perfume and again it's not strong or overpowering.

Overall I love the Dreams Unlimited range. The smell is really beautiful and sweet. It's definitely a great buy and at 60% off it was a bargain. The body butter only cost me NZ$15 and the perfume was around NZ$27.

Saturday, 27 April 2013

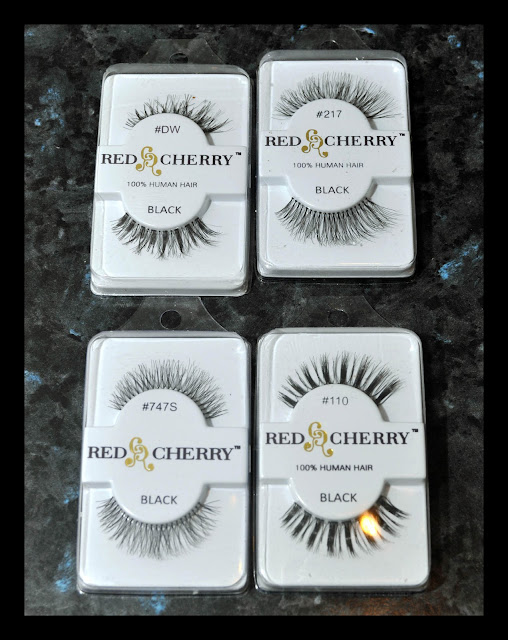
Makeup Geek Haul - Red Cherry Lashes, MUG Gel eyeliner review & swatches

So I have been eyeing the Makeup Geek (MUG) Gel Eyeliner for a while now... to be honest.. from last year. And finally a few weeks ago I went for it and purchased 3 of them. In addition of these gel eyeliners, I also purchased 4 x Red Cherry lashes.

You may have heard of Makeup Geek. If you haven't, here's a little bit of info. Makeup Geek is a beauty website run by Marlena. I found out about her through her Youtube Channel. Previously she just had the channel and the website but then she started producing her own products such as these gel eyeliners. She also has eyeshadows as well and they come in a range of beautiful colours.

So the three MUG gel eyeliners that I purchased were: Fame (beautiful dark teal), Amethyst (gorgeous purple) and Rave (dark shimmery/metallic brown). They were very affordable at US$7.99 compared to MAC Fluidline which is around $32 (I think).

I also purchased some Red Cherry false lashes since I have read some good reviews about it and they were only U$2.50 each. I purchased the Demi Wispies, #217, #747S, and #110. So far I have used the #747S and they look really nice on and it looks quite natural. I will post the EOTD using these lashes in the next few days.


So onto the gel eyeliners. First of all, I love them!! These gel eyeliners are amazing! The colours are gorgeous, they are very pigmented and they are long lasting. Once I applied them, they do not budge. I think they also work great as a base. I have only tried using Rave as a base and it glides on smoothly. I do find that Fame (teal) was a bit more tacky but it still applies beautifully.


Out of these 3 colours, I still can't decide which one of them is my favourite because I love them all. I love Fame and Amethyst because the colours are so gorgeous. And I love Rave too because it's not just a plain brown but a beautiful metallic/shimmery brown. As you can see above, before I actually used Fame it looks quite dark and matte but after I applied a swatch the colour is a beautiful gorgeous teal!

Here is a look I did the other day using Rave. I don't think this picture does it justice but it's definitely a great alternative to the usual black eyeliner.


Overall I am very happy with my Makeup Geek haul. I am tempted to purchase more of the gel eyeliners and also the MUG eyeshadows which I've heard are really nice and pigmented. The shipping to Australia wasn't too expensive. Overall I paid around $45 for the above haul so it was a good value!

I can't wait to try more MUG products but I think I have to put myself on a spending ban for now... so until next time.

Monday, 1 April 2013

Review: Lancôme Teint Visionnaire Foundation

So I was lucky enough to be chosen to be a part of Beauty Heaven's trial team for the new Lanc ôme Teint Visionnaire Skin Perfecting Makeup Duo Foundation.

The Teint Visionnaire combines 2 products into one: a foundation and a matching concealer.
The foundation contains [LR 2412] which is the star molecule of Visionnaire Advanced Skin Corrector serum.  Lanc ôme claims the [LR 2412] works day after day to smooth wrinkles and refine pores and reduce the appearance of imperfections. The Teint Visionnaire contains 2% of the [LR 2412] molecule while the Visionnaire skin perfecting serum contains 4%.
The concealer/corrector is a high coverage corrector which claims to immediately reduce the appearance of dark spots, dark circles and imperfections.

I was very excited when I got chosen to try out this foundation because this is the first expensive/high-end foundation I've tried.


First of all the packaging of the foundation is quite unique and different to others I've seen. It does look a bit bulky but I don't tend to carry foundation in my handbag so I don't mind the look of the bottle at all.
I really do love that this is a 2-in-1 product. I love how the concealer is built into the bottle. It is located on the top of the lid off the bottle. You just flip the cap lid open and there's a small mirror inside which is quite handy.


The instructions says that you first apply the high coverage corrector then follow by applying the foundation. I did not follow this as I like to apply concealer after I apply foundation since I find that the concealer moves around if you apply it under the foundation.

The consistency of the foundation is thin but not too runny and it applies smoothly on the skin. The coverage of the foundation is light to medium. I like to apply it with a light coverage but you definitely can build it up to a medium coverage. The foundation nicely evens out my skin tone and gives me a natural finish. In addition I found that this foundation works really well with my dry skin. It's not drying at all, it doesn't make my skin look cakey and it feels very lightweight on my skin.

The foundation has an SPF factor of 20 which is higher than any other foundations I have used before.

Now the corrector formula feels very thick and heavy. I found that I need to warm it up with my fingers before I can apply it onto my skin. The corrector is definitely high coverage as I only needed to use a tiny bit to cover any imperfections. I don't have much imperfections on my skin but I have a few redness and scars from pimples and the corrector covers it perfectly. I also applied a tiny bit of the corrector under my eyes and even though it is a high coverage corrector I didn't find it looking cakey. The colour of the corrector is a perfect match with the foundation colour.

The shade that I received was 04 Beige Nature. Just to let you know the skin tone on my face and neck is lighter than my décolletage area and arms so I tend to use a foundation that is slightly darker so it blends in nicely all over. When I had to choose the shade for the foundation I went to David Jones and swatched the other range of Lanc ôme Foundation and the sales assistant matched me to 04 Beige Nature in Teint Idole. When I got the foundation I thought that it looked quite dark. However it does not look as dark after blending it with my fingers into the skin. When I apply the foundation onto my face I found that it worked better applying it with my fingers as it warms the product up and blended it nicely. If I apply it with a brush I found that it is a little bit too dark.


So does this product live up to its claims of skin benefits? Well, I have been using this foundation everyday for nearly a month now and in terms of skin benefits I can see that my pores look a bit more refined and my skin looks even and feels smooth. However other than that I haven't seen any other skin improvements as yet. I will definitely keep using this and hopefully in another month I can see the benefits that it claims to have.

Overall I really do like this foundation. It is lightweight and looks natural on the skin. The only downside was the colour was a bit hard to match. I did go to the store and tried on the lighter shades and I found they were too light so I think I was in between shades. I do find that I can get away with it if I blend it in really well into the skin and use a lighter colour face powder to set it.


Saturday, 30 March 2013

Mirenesse Lip Bomb #4 - Review and Swatch

I recently got some new lip products, even though I already have tons of lipsticks and lipglosses I just couldn't resist.

This review is for the Mirenesse Lip Bomb in shade #4 which retails for A$39. It is a gloss, stain and lip lacquer in one.

Product claims (from Mirenesse website): A satisfying NEW INNOVATION in lip colour; beyond gloss, stain or lip lacquer. Colour that drenches your lips for a juicy high impact colour that's feather-light and super-moist with a velvety finish. Power packed with a non-smearing pigment that lasts and lasts....


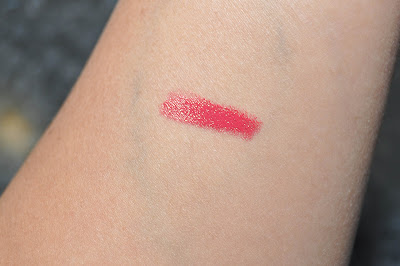
The colour that I got was #4 which is a bold bright pink.

The packaging is quite cute, it is a clear bullet shaped tube. The wand applicator is different from other lip glosses I own. It has the shape of an hourglass and I found it easy to apply the lip bomb.


The lip bomb itself....Well.... can I just say the colour is absolutely gorgeous and is very pigmented. One swipe on the lips is enough to give you a nice opaque finish. The lip bomb gives a beautiful glossy sheen finish on the lips. The consistency is similar to that of a lip gloss and I don't find it overly sticky at all. The lip bomb has a nice minty scent which I found was quite pleasant.

I found that this lip bomb lasts on your lips for hours. I was quite surprised at how long it lasted considering I drink quite a lot of water in the morning. I found that with eating and drinking the lip bomb stayed on my lips for a good 2 - 3 hours. I would imaging that it would have lasted longer if I did not drink or eat. Even after it started fading, it leaves a nice stain on the lips.
There are a few negative points that I had found. The lip bomb does feather a bit so you have to really be precise at applying it on the lips because once you accidentally mess it up, it does stain the skin. I also found that my lips felt a bit dry after a couple of hours of applying the lip bomb. However I think I can overcome this problem by applying some lip balm before applying the lip bomb. And lastly the price in my opinion is a negative as it is quite expensive compared to other lip products in the market.

Overall I really do love this lip bomb as this is probably the most long lasting lip gloss I've tried. I would definitely love to try the other colours but the price is holding me back. I guess I will have to keep an eye out for when it goes on sale.

Thursday, 28 March 2013

Review: Clinique Super City Block SPF30+

So you may or may not know that I am obsessed with applying sunscreen or skincare that has a minimum of SPF 30 everyday. Even on overcast day I still apply my sunscreen under my makeup. The latest product that I have been using is the Clinique Super City Block SPF 30+. It comes in a 40ml tube. It has a high protection of SPF 30+ and it provide protection from UVA and UVB rays.


Before using this, I didn't use much Clinique products. I have tried samples of Clinique moisturiser and treatments but it didn't suit my skin.  I was a bit worried when I purchased this that this may also be the case. However, this was not the case for this product. This oil free sunscreen suited my dry sensitive skin perfectly. I did not get any breakouts or reaction after applying this product.

The consistency of the product is quite thick but it is easily spreadable all over your face and you don't need much at all. This has last me a good few months. 

When you squeeze out the product you can see that it has a slight tint to it. The tint is quite light and I was worried it was going to leave a white tint on my face (my skin is around NC 25/30). However as you blend it out into your skin the tint is not as noticeable. Even though that this sunscreen is tinted, you may think it is similar to a tinted moisturiser but it's not. I don't think that it has much coverage at all after you blend it in your skin.

Top: with flash;   Bottom: without flash

Another thing I like about this sunscreen is that it does not have that strong sunscreen smell which I don't like. And after applying this all over my face I don't find that it is greasy at all and it actually works well as a primer under my makeup. I do find when my skin is very dry that I have to apply a hydrating moisturiser under the sunscreen but most times I apply this sunscreen on its own before applying makeup.

Overall I love this sunscreen and will definitely be repurchasing again. It is quite pricey though at AU$36 for the 40ml tube but as it did last me a few months I think it is a good value.

Wednesday, 20 March 2013

Moogoo Full Cream Moisturiser Review

So around a month ago I ran out of my moisturiser, MAC Lightful Ultramoisture Creme and I wanted to find something not too expensive. While I was browsing the health food shop I discovered the brand MooGoo. They are an organic skincare brand and I thought why not try an organic moisturiser. So after browsing around I got the MooGoo Full Cream moisturiser.


After purchasing I read a bit more about the MooGoo brand. They are made by an Australian company using natural and effective active ingredients designed for people with skin and scalp problems. Even though I don't really have a skin problem I do have quite dry skin so I thought this would be good.

The ingredients of the Full Cream are:
Purified water, Sweet almond oil, Olive fruit oil, Olive Squalene, Coconut oil, Cetearyl alcohol, Natural Vitamin E, Hydrollized milk protein, Aloe Vera leaf juice, Comfrey extract, Piroctone Olamine, Polysorbate 60 (food grade emulsifier), Honey, Apple cider vinegar and Hops extract.

So looking at all the ingredients above they all look natural and easily understood. It's paraben free and paraffin free and it is also fragrance free.

I have been using this moisturiser for around 4 weeks. I find that this moisturiser is quite moisturising but I am still finding that the skin on the sides of my nose are still dry and flaky (but not as much as before I used this moisturiser). One thing that did annoy me at the start was the smell. When I apply the moisturiser there is a noticeable smell. I don't know how to describe it other than it's sort of a milky smell or maybe an off milk which was a bit unpleasant. However now I don't notice this smell as much, probably because I am getting used to it.

The consistency of the moisturiser is quite thick but is still easily spreadable. You really don't need much at all. I usually use one pump and that's enough.


The price of this moisturiser is quite decent at AU$13.50 for 75ml. You can also get it in 250ml for $18.50 and instead of the pump bottle above, it comes in a jar.

Overall I think this moisturiser is quite alright. I find it hydrating and soothing for my dry skin and I find my skin feels soft and smooth after using this moisturiser. I don't know whether I will be repurchasing this again but I will keep using it until it's finished.

Monday, 18 March 2013

Antipodes Divine Face Oil - Organic Avocado Oil and Rosehip review


Today's review is on the Antipodes Divine Face Oil - Organic Avocado Oil and Rosehip. I purchased this a month ago on my trip to Wellington NZ. I purchased this along with the Grapeseed Butter Cleanser which I have reviewed last week here.

The Divine Face Oil claims that it has been scientifically shown to stimulate synthesis of collagen production in human skin cells by up to 51%. It also claims to lift tired, stressed and sun-damaged skin and help to reduce the appearance of lines, age spots and scars.

I've been using this oil for the past month now and I am loving it. My daily routine now involves applying 1-2 drops of the Divine Face Oil after cleansing and before applying moisturiser. I apply the oil both day and night. Some of you may ask - why do I use it during the day, wouldn't it be troublesome putting makeup over a face that's been covered in oil? The answer to that is no, I do not have any trouble at all applying makeup after applying this oil since it absorbs into the skin quite quickly. Even straight after application of this oil my skin does not feel oily or greasy.

After I started using this oil my skin feels more supple, healthy and hydrated. The oil keeps my very dry skin hydrated all day and all night long. I usually apply a few more drops at night time and in the morning I wake up with soft, smooth and hydrated skin. The oil definitely gives my skin that extra hydration boost that it needs especially I work everyday in a dry air conditioned building.

In terms of appearance of scars, I do have a couple of very light pimple scars which I got recently and I have found that these scars are disappearing slowly. I still can see a tiny bit of redness from the scar but it is not as bad as what it was before I started using this oil.

I love this oil and I will definitely be repurchasing. Even though it is a small bottle (30ml) I think this will last me at least a few months since I only need to use 1 - 2 drops per application.  Update: It's been a month since I posted this review and there is still over half a bottle left so it does last a long way.